
Biometric authentication, which allows you to authenticate to a software system with a fingerprint or facial recognition, has been around for a while. In 2003, IBM Thinkpads had a fingerprint reader which let you log in to your computer. In 2013, Apple included a fingerprint scanner on the iPhone 5S, though there were other phones that had it first (hello Motorola Atrix!).
But biometric authentication hasn’t been easily available to web applications until recently.
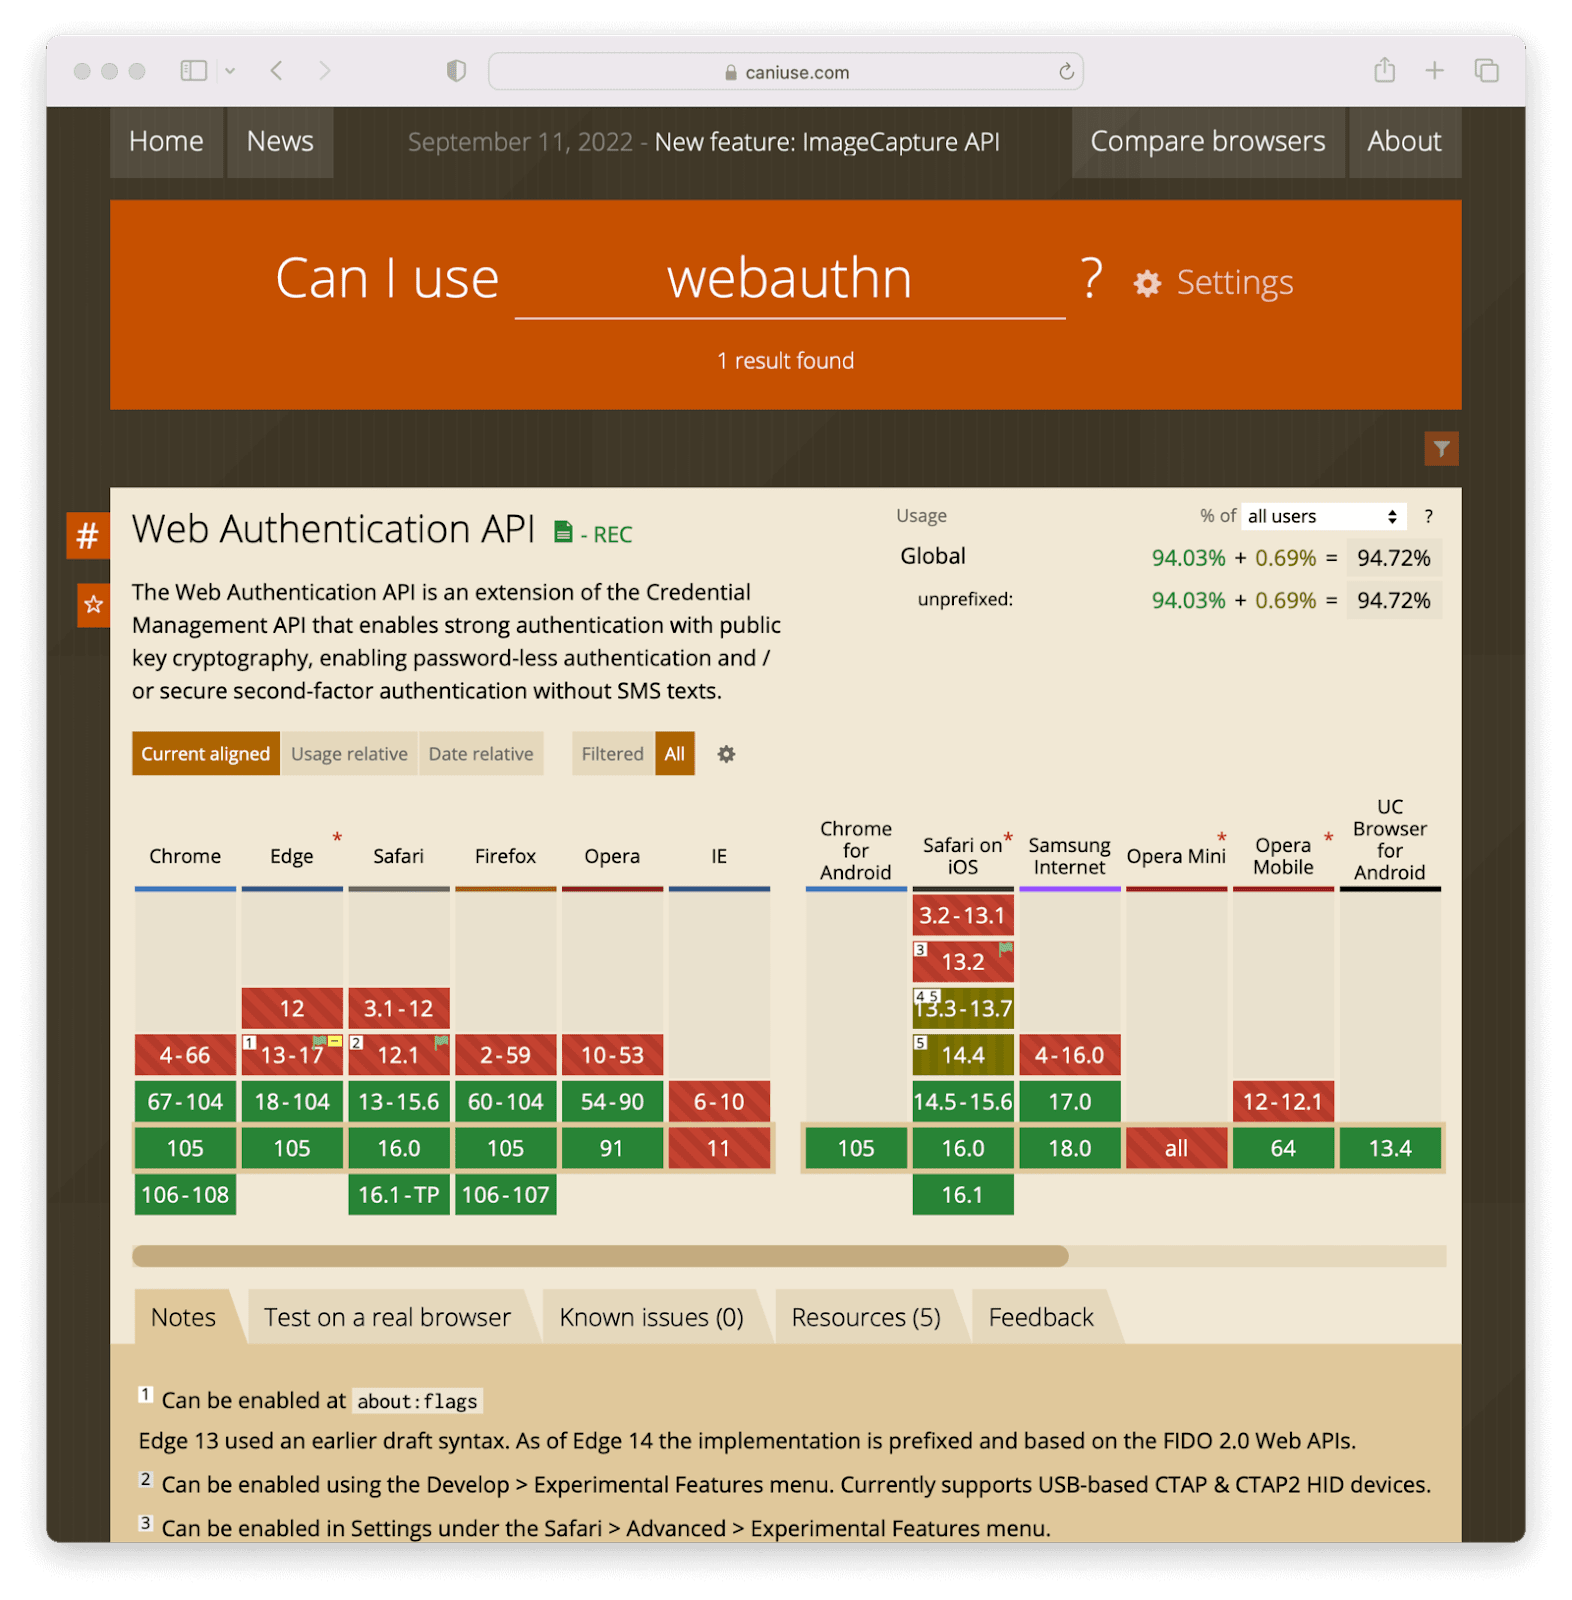
New web browser APIs make it easy to add strong biometric authentication to your web application.
What is biometric authentication
First, let’s talk about authentication in general. Biometric authentication is the general term for any authentication method which depends on a user’s physical attributes, such as a fingerprint, face, or voice.
There are three categories of authentication:
- Something you know, like a password
- Something you have, like a device
- Something you are, like a fingerprint
Biometric authentication has significant advantages over other options:
- It is difficult to lose
- It is hard to steal
- It can’t be shared
- You can’t forget it
Letting your users authenticate using their biometrics has significant security and convenience advantages. According to “Biometric Authentication on iPhone and Android:
Usability, Perceptions, and Influences on Adoption,” a paper published in 2015, “...participants found Android face unlock and iPhone fingerprint unlock to be easy to use in a number of common usage scenarios.” By their very nature, biometric methods are more difficult for attackers to obtain than knowledge based authentication methods such as passwords.
You also don’t have to use biometric authentication alone. When combined with other authentication methods, such as a password or a magic link, biometric authentication can provide additional security without adding friction to the user experience.
How to add biometric functionality to your webapp
The easiest way to add biometric authentication to your web application is to use a standard called WebAuthn. This is supported by every major browser (except IE, sorry IE users!) and links a friendly JavaScript API to a variety of hardware based authentication methods, including biometric options supported by desktop and mobile operating systems.
To add strong WebAuthn-based authentication, including biometric options, take the following high level steps:
- Check to see if WebAuthn is supported using a JavaScript API to test the current browser.
- Prompt the user to add a biometric authentication method
- Associate the method with the account
- At next login, identify the user in some fashion
- Set a cookie when they add the method
- Ask for their username
- When you know who they are, prompt a WebAuthn login
- The biometric authenticator (the phone or operating system) will issue an authentication challenge
- The user answers it by providing their fingerprint or whatever biometric proof is needed
- Your JavaScript receives and interprets a message from the browser
- If the message indicates successful authentication, log the user in
The actual code is pretty straightforward.
To confirm that the browser supports WebAuthn, run this code:
if (window.PublicKeyCredential) {
  // do your webauthn stuff
} else {
  // wah-wah, back to passwords for you
}
Then, to add a biometric authentication method, you call this JavaScript method:
navigator.credentials.create(options);To prompt a biometric login, use this JavaScript:
navigator.credentials.get(options);The options object is critical and includes information about what type of credential you are asking for, a nonce that prevents replay attacks, and information about the requesting website. Full details are covered in the specification, but we’ll also cover the options object in detail below.
We’ve got standards
It’s worth understanding the standards that allow a web application to leverage something like a user’s phone’s TouchID system for login. There are three main standards you should know about:
- WebAuthn, as already mentioned
- CTAP2
- FIDO2
WebAuthn is also known as the Web Authentication API. This is the standard mentioned above, and as a web developer, the main one you’ll interact with. This API lets you communicate with browsers, such as Chrome or Safari, to request biometric and other means of authentication.
The second is CTAP2, which dictates how the browser interacts with what’s called an authenticator. An authenticator is the piece of hardware that authenticates a user with cryptographic certainty. In a biometric scenario, this might be an iOS device or Windows Hello. In general, as a web developer, you won’t be concerned with this standard, as the browser insulates you from it, but it is worthwhile to know it is in the mix.
If you are confused about how WebAuthn and CTAP2 interact, here’s a diagram. In this diagram, the user is the smiley face, the orange box is an authenticator like TouchID or Android Fingerprint Sensor, the white globe is the browser, and the blue box is a website.
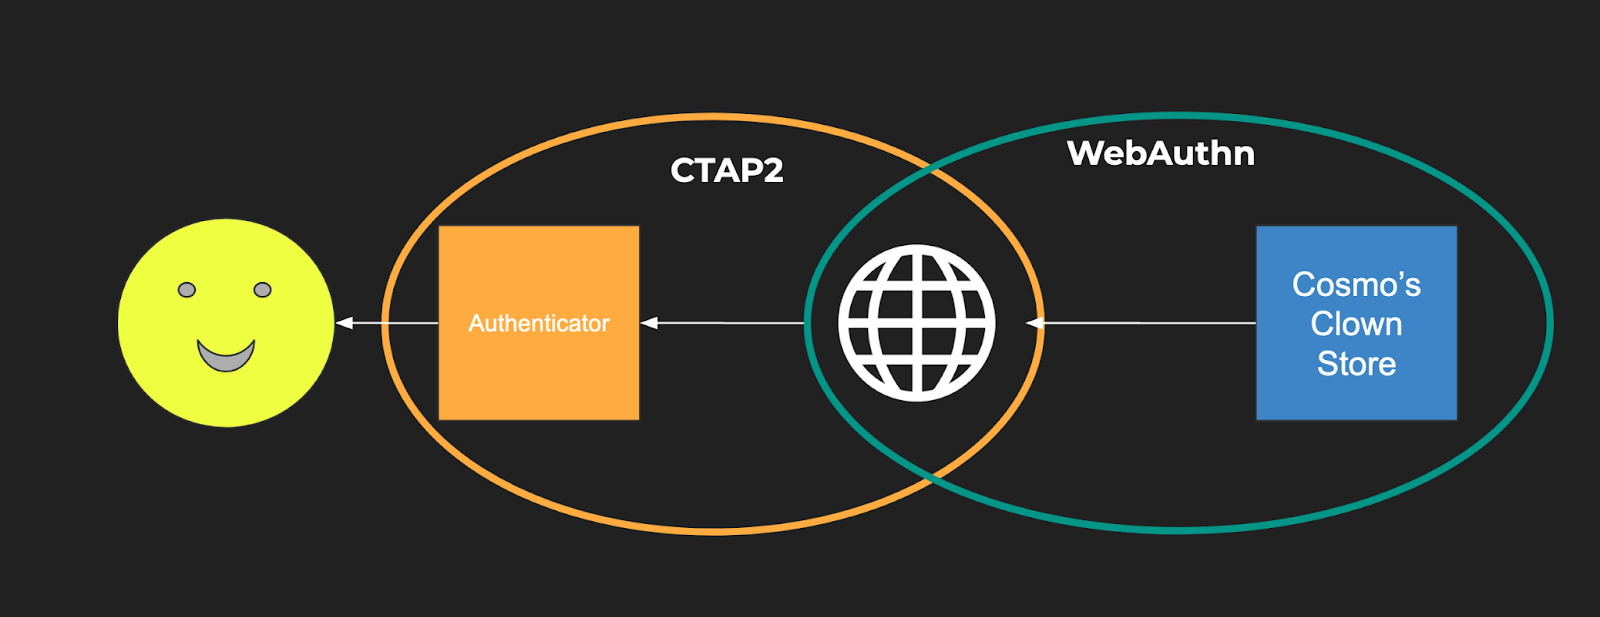
Finally, last but not least, FIDO2 is the umbrella standard. FIDO2 includes both CTAP2 and WebAuthn. (CTAP1, the first version of CTAP, is supported for backwards compatibility.)
What is an authenticator?
Authenticators are what actually perform the biometric or other form of authentication. While this article focuses on biometric authentication, authenticators offer other methods to authenticate the user. At the heart of each authenticator is a way to generate and store public/private key pairs. The public key is shared with the web application and the private key is held securely by the authenticator.
An authenticator can be implemented in hardware or software, but software authenticators such as the one available in Chrome DevTools are only recommended for testing, not for production use.
There are two main categories of authenticators, cross-platform and platform. Cross-platform authenticators can be used on more than one device. Platform authenticators are tied to a specific device, such as a phone. Most consumer-focused biometric authenticators are integrated into an operating system such as iOS, Android, or Windows. This means they are tied to a given device and are therefore platform authenticators.
The other important aspect of an authenticator is whether they test for user presence or user verification. User presence simply indicates that someone interacted with the authenticator (this interaction is called an “authorization gesture”) perhaps by clicking a button. Such a test of presence is useful if you are using an authenticator as part of a multi-factor authentication process.
User verification, on the other hand, offers assurances that the user who authenticated is actually who we think they are. This can be done by providing something they know, or, in the biometric case, using an attribute of the user such as the dimensions of their face. In most cases, you’ll be interested in user verification, which is what the common biometric authenticators provide.
Choices, choices
Due to the abstraction of the WebAuthn API, you can’t be certain the user is authenticating via a biometric. You can take certain steps to encourage it, but you can’t force it.
However, biometric authentication tied to popular operating systems are a quite prevalent form of WebAuthn-compatible hardware, so it is likely that if you encourage your users to set up WebAuthn logins, they’ll be using biometrics. You can also encourage this via the messaging on your website.
Even if they aren’t using biometrics, if you use WebAuthn, you can rest assured that they’ll be using a secure hardware solution for their authentication needs.
If the WebAuthn authentication succeeds, you won’t know what method was used. What you can control:
- If you’d prefer a cross-platform or platform authenticator to be used.
- Asking for either user presence or user verification.
Next, let’s dig in deeper to the flow of a user who is using WebAuthn-enabled biometric method to log in.
What are “ceremonies”?
If you read up about WebAuhn, you might hear the word “ceremony.” Ceremonies, in the context of WebAuthn, are prescribed interactions between software, hardware, and physical entities such as human beings or devices. You can think of ceremonies as network protocols extended to the physical world.
There are two types of ceremonies defined in WebAuthn, and both are required for biometric authentication to work with your web application.
Registration
The first ceremony is registration, where the authenticator is, well, registered with your website. Likewise, your website is registered with the authenticator. The end result of a registration is a credential, which is used in later ceremonies.
To register an authenticator, use this code:
navigator.credentials.create(options);As promised above, let’s dive into this in more detail. The options object looks like this:
options =  {
  publicKey: {
	rp: { id: "cosmosclownstore.com",
      	name: "Cosmo’s Clown Store" },
	user: { id: "1234",
        	name: "krusty@example.com",
        	displayName: "Krusty The Clown" },
	challenge: "...",
	pubKeyCredParams: [ { type: "public-key", alg: -7 }],
            authenticatorSelection: {}
	//...
  }
}
Let’s look at this options object in more detail.
First, the rp field contains data about your web application. WebAuthn includes built-in security constraints such as:
- Requiring all API calls to take place from a page served up by HTTPS.
- Forcing the identifier of the website at registration to match the current hostname.
When you are registering, you as the webapp developer can specify a broader domain if you’d like to be able to accept the new credential across multiple subdomains.
For example, if I register with an rp.id of cosmosclownstore.com, but later request a biometric login from a webapp hosted at app.cosmosclownstore.com, it will be allowed.
However, if I register with an rp.id of app.cosmosclownstore.com, then try to start a biometric authentication session from an app hosted at store.cosmosclownstore.com, it won’t.
Second, you have the user field, which contains information about this user. This ties the credential that is created on the authenticator to the account on the website. You may notice this implies that the user already has an account on the website, and that the new WebAuthn credentials are only another means of authentication, not the primary one. That is generally true, though there are authenticators that support something called “discoverable credentials,” which work around this limitation.
Third, there’s a challenge field, which is a nonce to prevent replay attacks. It’s a unique high-entropy string you as the web app developer must provide. This challenge will be returned in the response and you must verify they are the same.
Fourth, there’s the pubKeyCredParams field, which indicates what kind of public private key algorithm you are interested in supporting. The values of the objects in the array are defined in this IANA document, but -7, indicating ECDSA w/ SHA-256, is guaranteed to be supported—it’s required by the specification.
Finally, there’s the authenticatorSelection field, which lets you indicate certain attributes of the authenticators for this ceremony. This includes the cross-platform/platform category as mentioned above.
After you build the options object and call navigator.credentials.create(options);, the user will be prompted by the authenticator to add a credential for your website. They’ll see information about you website from the rp object, as well as information about their account in the user object. If they choose to register, you’ll get back a response. Here’s an example response:
{
  response: {
    clientDataJSON: {
      type: “webauthn.create”,
      challenge: ... // should match initial challenge
      origin: ... //
    },
    attestationObject: {
      authData: {
        attestedCredentialData: {
          credentialId: ...,
          credentialPublicKey: ...,
        }
      }, // other stuff about attestation
    }
  }
}
The interesting parts are the clientDataJSON object, which has a couple of fields you should validate, including the type, challenge, and origin. Make sure these are as expected.
The confirmation of successful registration occurs in the attestationObject.authData.attestedCredentialData object, which includes the credentialId and the credentialPublicKey. These values must be associated with the user’s account; they’ll be used by the next ceremony—authentication—which will be discussed in detail below.
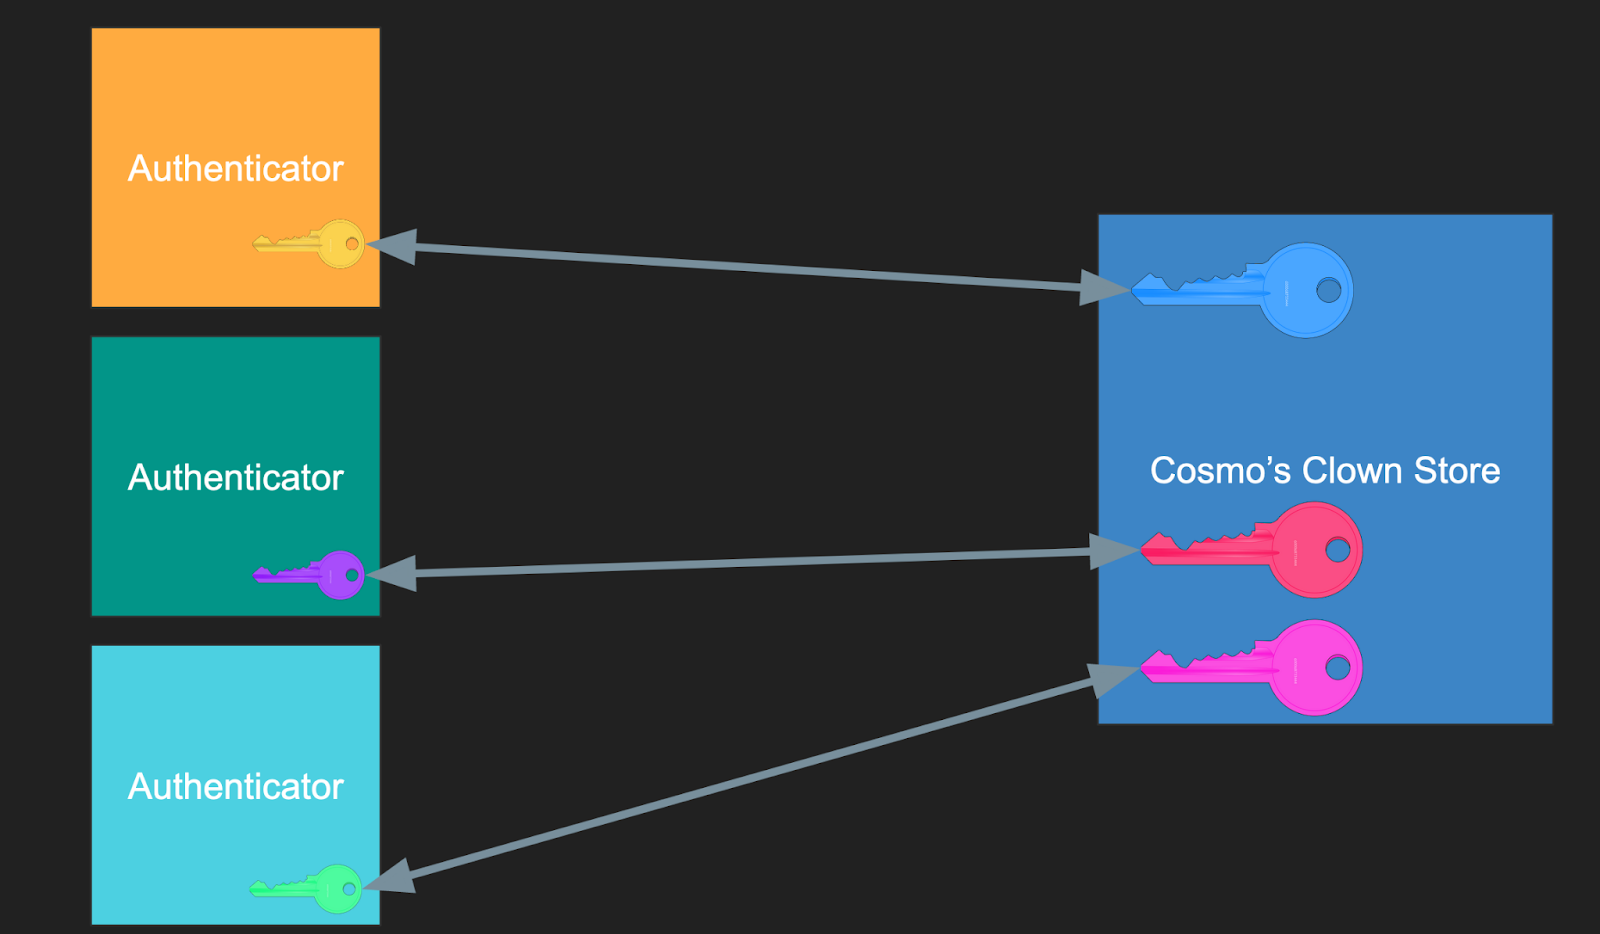
Just like a username/password credential, multiple users may register using biometric authentication on a given website. Below, the website for Cosmo’s Clown Store holds public keys from multiple users’ authenticators:
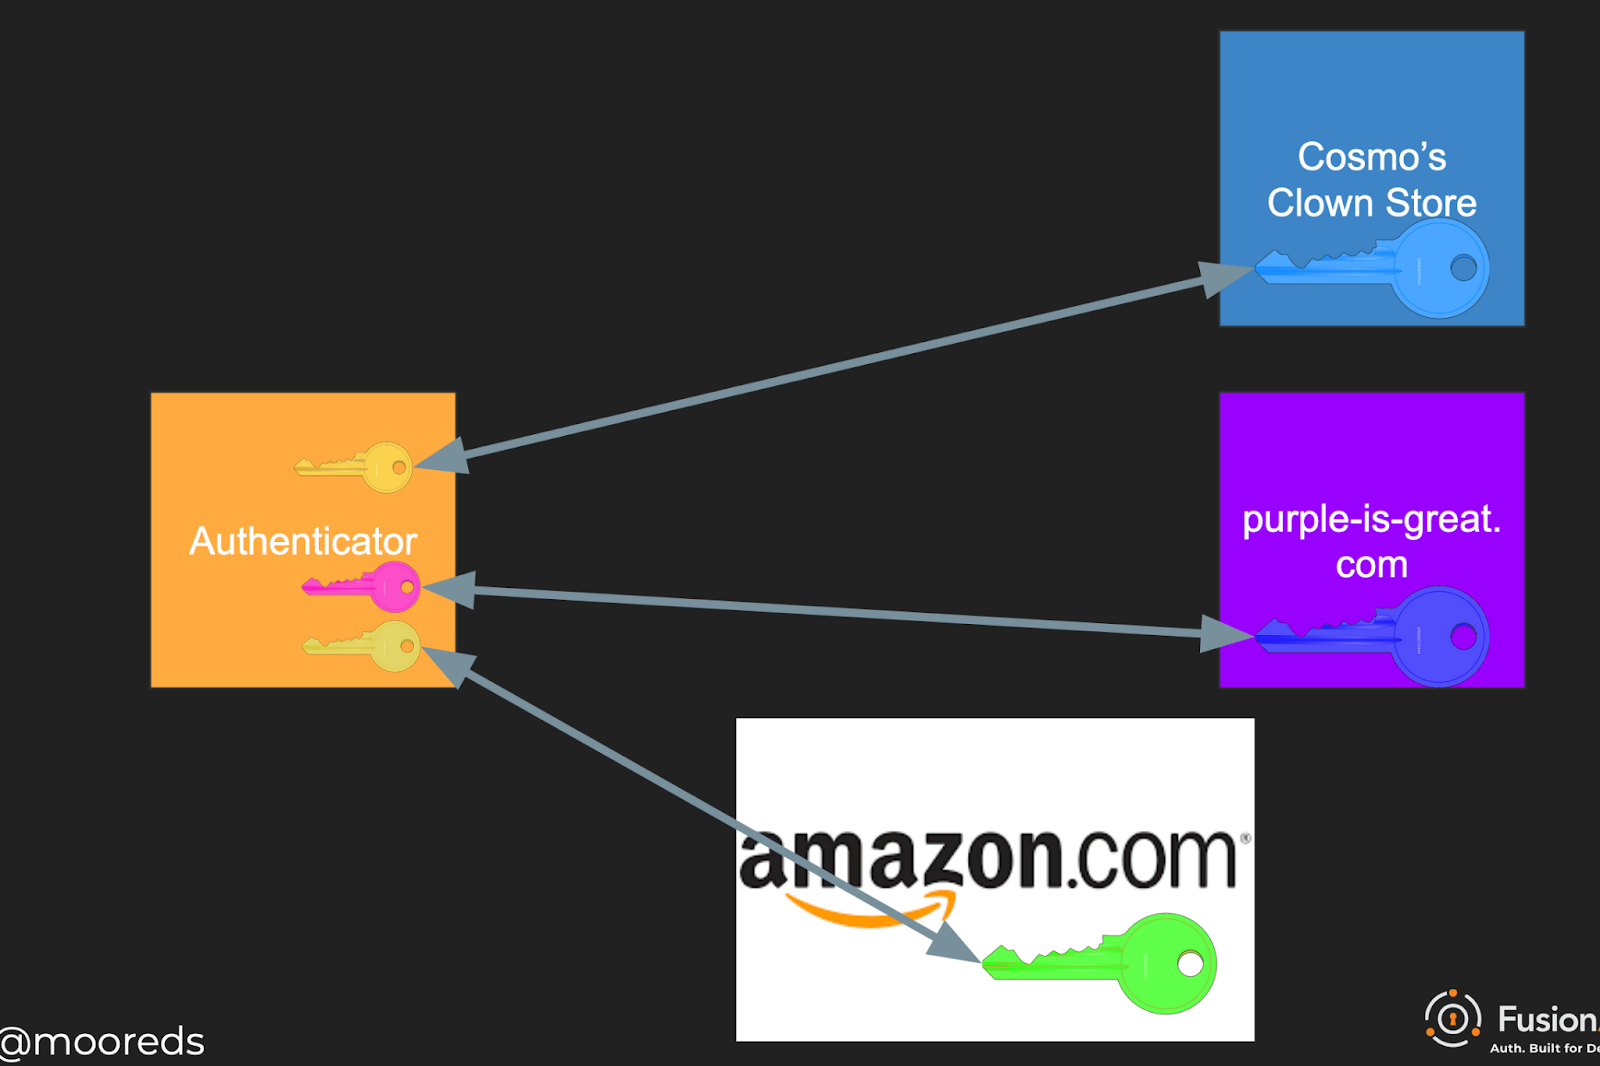
But, crucially, each different website gets a different registration and credential (also called a “passkey”) on the same authenticator. Below, multiple websites hold a public key matching one of many private keys on a single user’s authenticator:
Authentication
Once your user has registered a biometric authentication method, they can now log in with their face or fingerprint. To prompt a biometric login, use this JavaScript:
navigator.credentials.get(options);Again, the options object is critical. Here’s a sample options object:
credentialId = // value pulled from data stored at registration

options = {
  publicKey: {
	rpId: "cosmosclownstore.com",
	challenge: "...",
	userVerification: "preferred",
	allowCredentials: [{ type: "public-key", id: credentialId }]
	//...
  }
}
Here, the rpId is the website identifier previously registered. The challenge again is a random string. userVerification specifies if we want the user to be verified or only test for user presence.
The allowCredentials field includes the list of allowable credentials for this login. The value of credentialId was stored by the server during the registration process. Therefore, you must have some other way of identifying the user before making the navigator.credentials.get(options); request so you can retrieve the correct credential id from the server side data store.
Options include:
- Set a cookie when they register
- Ask for their username
After you build the options object and make the get request, you’ll be returned a response. That might look something like this:
{
  authenticatorData: {
	rpIdHash : ..., // hash of the requesting party Id
	flags : ..., // bit array including authentication results
	// other info
  },
  clientDataJSON: {
	type: "webauthn.get",
	challenge: ... // should match initial challenge
  }
}
Similarly to the registration ceremony, verify the values, such as the challenge and the type, in the clientDataJSON object to make sure they are what you expect.
In addition, examine the authenticatorData.rpIdHash to make sure that the value matches a SHA256 hash of the rpId presented in the request. This value is the hashed rpId that the browser saw. If it is different than what the webapp presented, you may have a man-in-the-middle attack.
Finally, the authenticatorData.flags field is a bit field which contains the results of the authentication. Bit 0 is set if the user was present, and bit 2 is set if the user was verified.
Beyond the ceremonies
Integrating biometric authentication into your webapp without extensive integration work is pretty cool, especially since almost everyone with a smart phone now has such an authenticator in their pocket.
However, there’s other work to do to build a full biometric login system. Additional items to be aware of:
- Unless you do certain things beyond the specification (“passkeys” managed by a central server), each credential is tied to a specific authenticator. This means that while biometric authentication is great as an alternative authentication method, it shouldn’t be the only one, unless you have a robust account recovery process. Otherwise a lost phone will mean an abandoned account.
- While the JavaScript code to register and log a user in is pretty straightforward, there’s some work to determine if the user has a valid biometric authenticator, store the credentials safely after registration, and prompt the user to log in using their biometric credentials. This scaffolding is required, but I haven’t seen libraries which help with it; be prepared to write your own logic.
- You can use WebAuthn as a second part of an MFA process, as mentioned above. It is remarkably phishing resistant, since you must have possession of the authenticator to complete the authentication ceremony.
Further Reading
For further education and implementation resources, check out the following sites:
- Web Authentication: An API for accessing Public Key Credentials - Level 2: the WebAuthn specification
- Web Authentication API: MDN’s docs on the Credentials API
- WebAuthn Developer Guide: YubiKey’s docs, explains a lot about WebAuthn concepts, mostly focused on a cross-platform authenticator